He Ain't Gonna Jump No More! AAR & Review
This past weekend I got to run Tom Mecredy's He Ain't Gonna Jump No More for a group of friends. HAGJNM is "tournament module" (or "capsule game") in which players control paratrooper squads during D-day. Players have 21 hours to complete as many objectives as possible before the main landing force arrives, after which they are scored according to a set of criteria.
What I Did to Prep
The module requires chewing. Although the rules for combat and task resolution are very familiar to OSR players, the scenario is quite complex. It has four main load-bearing components:
- A detailed timeline covers "fixed" events between the paratroopers' landing and the scenario's end at midnight. The referee has to carefully track players' actions against it and resolve events like bombing runs, glider landings, and reinforcements.
- The main objectives (artillery batteries, bridgeheads, and beach exits) as well as the larger settlements are given detailed writeups, akin to a typical hexcrawl POI.
- The remaining hexes are left to be procedurally generated during play. These minor features can be things like crashed gliders, farmhouses occupied by German soldiers, straggling paratroopers, or minefields.
- Random encounters -- separate from the above, which only covers static POIs, there are tables for "wandering" encounters.
I agreed to run the scenario with less than a week's notice, and because I am generally bad at time management I had less time to prepare than I would have preferred. What I did:
- I did an initial skim of the referee- and player-facing documents to figure out what's even in the module (there is no table of contents). I took the time to fully read of the play sample given in the players' guide.
- Next, I did a more detailed read-through, noting the main components listed above, and trying to imagine how I would run certain situations.
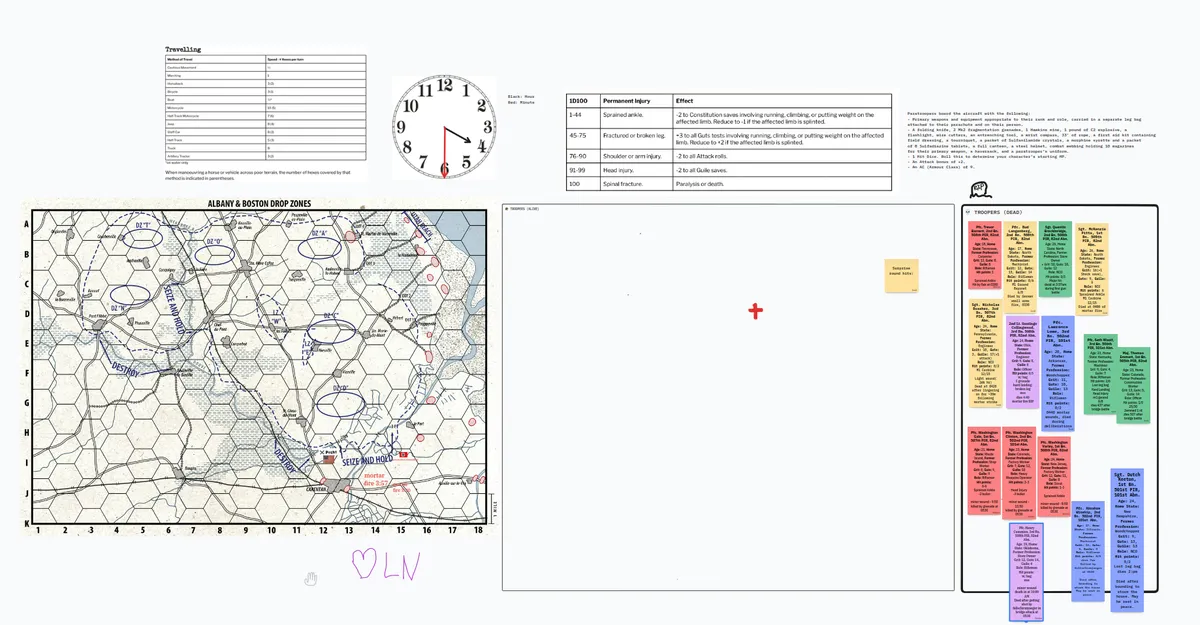
- I prepped a simple TLDraw whiteboard, with space to track PCs (using sticky notes), the player-facing map, and a clock.
- I printed out the player-facing map and marked it up with the location of each objective, notable settlement, landmark, and target-of-opportunity. Objectives are already on the player version and ToOs on the GM-facing map, but these are designed to look like real-life WWII-era maps and are a bit confusing unless you know your NATO symbols well.
- I watched the first 2.5 episodes of HBO's Band of Brothers
Play Report
We made it through 1.66 in-game hours during 4 real-world ones. The following is a summary of events -- unfortunately a bit thin as my notes got kind of messy. Records of my judgments and die rolls are in italics.
Players: Jacob, Eliot, Kyle, Scribble, each controlling 5 troopers.
0300: The troopers jump, into a hell of exploding flak and flaming transport planes. Pfc. Barnett is killed by flak on the way down, many others sustain injuries (sprains, broken legs, and concussions) upon landing. The radio operator loses his leg bag, and with it his radio. The troopers landed in sector J15, south of the intended area of operations and a few miles east of Carentan.
The drop zone was randomly rolled, and I was surprised to get a hex on the southeastern corner of the map. Technically, each player is supposed to land in a separate hex, but I decided to keep everyone together. Troopers are randomly rolled with a parent formation, so it does seem like the intended party is an ad-hoc formation comprised of troopers who landed nearby each other.
0310: The troopers regroup. Major Emmet is panicking, so command falls to 2nd. Lt. Collingwood
The Major's player joined at the last minute, was not familiar with OSR games or even aware that this was going to be a ttrpg, so he handed over command to another player.
0320: Debate regarding the location of the drop zone. There is an east-west road with a southeast branch, and a steeple is visible to the west, illuminated by flashes of exploding flak. Possible locations are narrowed to sites east of Pont l'Abbe, Chef-du-pont, or Carentan, with the latter (correctly) deemed likeliest. While they deliberate, perimeter scouts spot a column of German troops marching from east to west along the road. An ambush is set.
I really enjoyed the inherent navigational challenge here. I decided that time spent consulting the map should advance the clock 10 minutes, and then rolled a random encounter with a platoon of Osttruppen. Surprise rolls determined that the paratroopers were not surprised but the German Chechen conscripts were, so I let the players specify how they wanted to ambush the column.
0330: The ambush is sprung. As the platoon of Osttruppen soldiers passes, the paratroopers open fire from hidden positions on both sides of the road. 8 are killed in the initial fusillade. 2nd. Lt. Marlin Jefferson takes a friendly-fire ricochet. The ambushees were uncharacteristically steadfast and held position to return fire rather than routing. Multiple paratroopers sustained wounds before a round of grenades finished off the remaining 16 soldiers.
As soon as the sound of fighting died down, it was replaced by the explosion of a granatenwerfer mortar. Pfc. Bud Langenberg died.
Somehow, despite Osttruppen having -2 morale and a further -2 from ambush, I got an 11 on the dice so they were merely suppressed. I rolled a random "stationary" encounter which is supposed to be either sniper fire or mortar shelling. Since it was dark out, I felt the latter to be more likely. Rules for how random-encounter mortars are targeted were a bit unclear, so I used a d12 roll to see which section of the paratroopers was affected, or if the shot went wide.
0340: Spooked by the mortar fire, the soldiers advance north. German soldiers are spotted to the north, taking positions near a system of small canals. Rather than engage, the troopers divert their course to the southwest.
I rolled another random encounter, this time with a platoon of wehrmacht regulars. No surprise on either side, but the players won initiative, so I let them decline the engagement and change course.
0400: Eight straggling paratroopers are found, identified with the "Thunder"/"Flash" codewords. They join, a welcome replacement for the party's killed and wounded. One has a radio, and battalion command in drop zone D is contacted. Col. Wolverton of the 101st issued the order to search the town of Le Port for stragglers, and informed them that artillery support from an M1 pack howitzer was available.
After some deliberation, it was decided that the orders to head to Le Port would be "misheard", and the bridge objective northwest of Carentan pursued instead. Another mortar round got everyone moving again.
The stragglers were encountered as a result of searching a hex, rather than a wandering random encounter. I improvised the results of radio contact (except for the orders, which were rolled on a random table), doing my best to make the situation believable. Having a howitzer available this early was probably unrealistic, as most glider landings were scheduled for later in the timeline.
0440: The paratroopers advanced toward the bridge in H12. This was guarded by a platoon of elite fallschirmjaeger entrenched in roadside foxholes and in a hilltop farmhouse. Next to the farmhouse, a luftwaffe team crewed an 8.8mm flak 38 battery. Two MGs were set up in sandbag emplacements guarding the northern approach from the bridge.
The paratroopers, attacking from the southeast, decided to call in artillery support to take out the MG nests. They elected to send one contingent across the road to attack the foxholes on the west side, and another to advance across the fields to take out the flak 38 crew and house garrison with grenades.
The plan was successful. The initial howitzer shell took out both MG nests. Heavy losses were sustained by the group attacking the foxholes, but a round of grenades was able to clear the roadside. Grenades were effective at taking out the flak crew, but the initial round didn't enter the farmhouse. The garrison was able to get several kills, and a grenade from the officer in charge was able to wipe out three soldiers (all with the first name "Washington").
The few surviving Germans routed, and the paratroopers were able to blow the bridge, shielding the beachheads against a counter-attack.
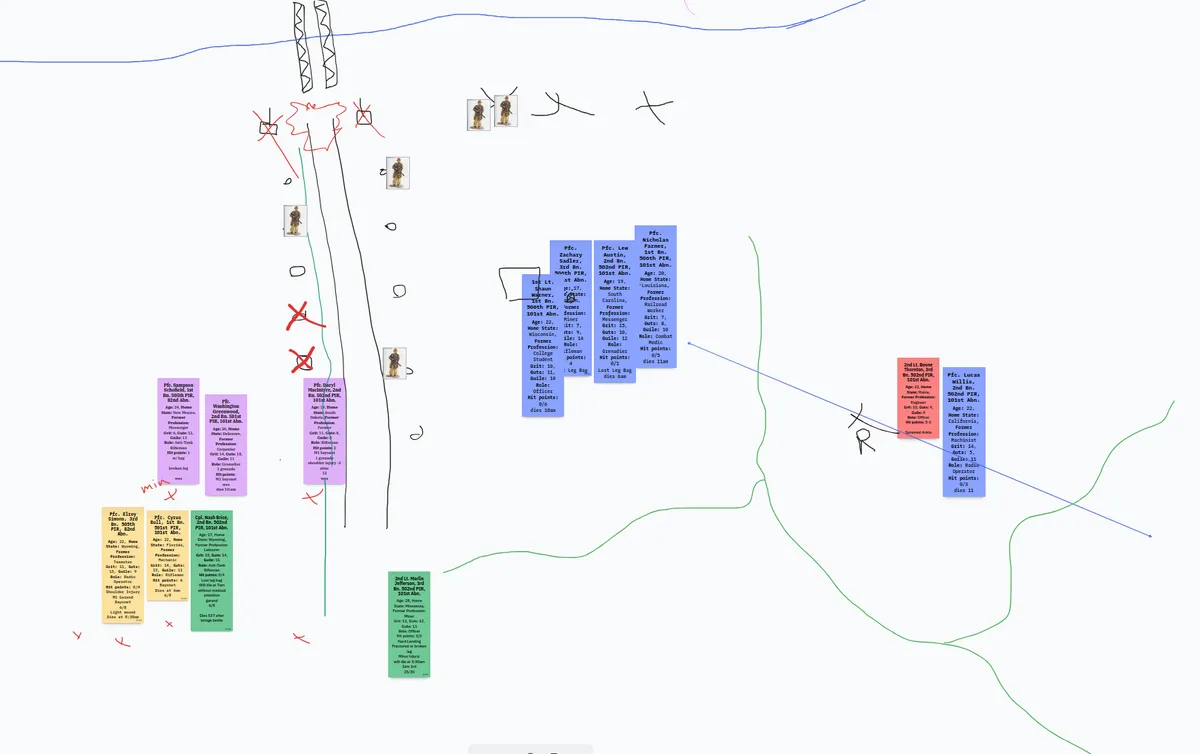
This location was an objective, so it had a detailed description in the key. I ended up drawing a TLdraw battlemap for it, which helped a lot. At this point, we ran out of (IRL) time.
Aftermath
Out of 28 PC paratroopers, 15 died serving their country. (Note that some of the ones listed died of wounds after play ceased -- we concluded that the earliest a field hospital could be reached was around 6 AM.)
- Pfc. Trevor Barnett -- hit by flak at 0300
- Pfc. Bud Langenberg -- died by Ostrtuppen small arms fire 0330
- Sgt. Quentin Breckenridge -- -- died of wounds sustained from Ostrtuppen small arms fire 0350
- Sgt. McKenzie Pitts -- died 0400 of mortar fire
- Sgt. Nicholas Brasher -- died 0430 of wounds sustained during mortar strike
- 2nd Lt. Santiago Collingwood -- died 0440 of wounds sustained during mortar strike
- Pfc. Lawrence Lowe -- died 0440 of wounds sustained during mortar strike
- Pfc. Seth Woolf -- died 0437 after bridge battle
- Maj. Thomas Emmett -- died 0507 after bridge battle
- Pfc. Washington Gale -- died 0530 to Fallschirmjaeger grenade
- Pfc. Washington Clinton -- died 0530 to Fallschirmjaeger grenade
- Pfc. Washington Varley -- died 0530 to Fallschirmjaeger grenade
- Pfc. Henry Cummins -- died 0530 to Fallschirmjaeger small arms
- Pfc. Abraham Winship -- died after bounding in to storm the house by the bridge objective
- Sgt. Dutch Keeton -- died after bounding in to storm the house by the bridge objective
The following score was attained for 100 total points:
- 25 points for destroying the bridge
- 10 points for capturing the flak 38
- 10 points for killing 2 enemy officers
- 28 points from combat infanyryman's badges
- 27 points from purple hearts
Review
We only made it through 1.5 of the 23 hours the module is supposed to cover. Someday I'd love to try to play out the whole duration, but in our 4 hours of IRL playtime I think we covered enough for me to feel grounded in writing a review.
The thing I liked best about HAGJNM is its ability to create what I'll call "procedural chaos".
Right off the bat, you have to do a series of die rolls for each paratrooper to figure out if they lost their equipment during the jump, if they injured themselves upon landing (and how), and if they got hit by flak on the way down. Then, the landing site itself is randomized, and there's a chance of rolling a random encounter at the landing site. The players were scrambling to figure out who was in command, if they had a radio, medic, or MG, who had weapons, etc.
Likewise, the combat involves ricochets, gun jams and random injuries, so each encounter is very uncertain. Wounds incur a randomized amount of time till death (unless treated at a field hospital), and, oddly, I think a lot of the fun came from the constant triage process as different soldiers acquired wounds of varying lethality.
And then, of course, the randomized POIs and encounters create a feel of constant insecurity and chaos. In addition to the usual random encounter rolls, there's a chance that a stationary platoon comes under mortar or sniper fire, so there's constant pressure to stay on the move, and constant risk that any plan will get completely upended by a lucky granatenwerfer hit.
I also really liked that the module is well-researched and weaves in lots of historical detail. Despite having most of the demographic risk factors for niche WWII expertise, I don't have a ton of familiarity with specific battles and guns and whatnot. HAGJNM provided everything I needed: clear descriptions of enemy orders-of-battle, writeups of weapon capabilities, and context for the objectives and risks of the operation. My favorite section is a whole page just describing the physical geography of the area -- how tall the hedgerows are, what a typical french farmhouse is like, etc.
This was all appreciated because the module asks the referee to do a lot of improvisation, given its reliance on procedurally generated encounters and minor POIs. As someone used to running OD&D (and more recently Classic Traveller) turning 2d6 enemy soldiers into an interesting random encounter is hardly a new challenge, but it is tougher to do convincingly in a historical game where there is a sense one can get the details wrong.
With that said, I have a few criticisms.
First, the organization of the documents could be improved. I like that it is presented as plain markdown export, and wouldn't want it to be "layout-ified", but simple additions like a table of contents or page number references would make the documents much easier to use. There are also some cases where relevant rules are spread across sections or even booklets -- to resolve artillery, one needs the indirect fire rules on p. 14 and rules printed next to the table or artillery weapon stats on p. 6. Likewise, some of the rules for random encounters are given in the player-facing rules, but others are in the ref-facing booklet.
Some rules are missing or unclear -- notably, several situations call for damage rolls without a to-hit roll, but the wound table relies on a to-hit roll. I ruled that we would just roll a d20, but this skewed non-bullet wounds toward minor, which felt off when it's coming from a howitzer or whatever. There should also really be a legend for the provided maps.
Second, I felt like the level of detail in the combat system was slightly mismatched to the scale of the scenario. To resolve the simplest case (one guy shooting at another), you need to:
- Roll a to-hit roll, factoring in AC and cover
- Roll additional d6s for auto/semi-auto fire
- On a hit:
- Roll damage
- Allocate additional auto/semi-auto hits and roll damage
- Check for overpenetration
- (If vs. a PC) look up the to-hit roll on the wounds table and resolve
- On a miss, check for a ricochet, rolling a random direction and then resolving damage/wounds vs whoever is in the way.
Obviously, this isn't that demanding, but players are controlling 5 guys each and enemy encounters are often with platoons of 25+ men, so combat takes a while. By the end, we ended up rolling to-hit rolls en masse, using a digital die-roller to randomly assign hits to targeted formations, and ignoring overpenetration and ricochets except where obviously appropriate.
We were running average-sized combats, but in theory one can encounter even larger formations, or participate in large battles like the German counter-attack on Carentan. Running these as is would either take hours, or would require lots of referee-imposed elision.
Relatedly, the other issue I found myself running into is that the rules for ricochets, grenades, and overpenetration pre-suppose fairly precise positioning of combatants. You kind of need a battlemap or miniatures of some sort, and the ref has to spin up fairly detailed terrain on the fly. I found myself wishing that the module had included some generic skirmish-scale example maps alongside the town and region maps (e.g. a typical farmhouse & fields, a typical German fighting position, etc.)
Finally, on a broad level it feels a bit like HAGJNM can't quite decide whether it wants to be a wargame or an adventure game. The scale of the scenario, detailed invasion timeline, and scoring rules make it feel like there should be some way for the referee to impartially track the progress of the wider battle as the players act within it, but the actual tools provided are only enough to create a series of atmospheric vignettes and skirmish scenarios that capture the feel of being a paratrooper amidst the chaos of D-Day. I don't think there's quite enough there for the scoring rules to render one playthrough meaningfully commensurate with another -- but they do work well as an incentive structure to steer players toward completing objectives.
Concluding thoughts
I really enjoyed running HAGJNM even when it was challenging, and could see myself running it at cons in the future.
I would like HAGJNM even better if it had:
- More detailed maps of each location, with the locations of German positions and fortifications. (Even just generic example maps would work).
- More clarity on how to adjudicate large scale combat actions, and/or more abstracted combat rules.
- More clarity on the envisioned scenario start conditions and mode of play.
- Slightly better organization and cross-referencing between sections.
With that said, it's a well-researched labor of love, and a very original approach to the OSR formula. We absolutely had fun with it and I do recommend it as well worth the $20 price tag.